Difference between revisions of "IPMI"
| (16 intermediate revisions by 3 users not shown) | |||
| Line 1: | Line 1: | ||
= IPMI - Intelligent Platform Management Interface = | = IPMI - Intelligent Platform Management Interface = | ||
| − | |||
| − | [[ | + | [[ Gourd ]], [[ Taro ]], and [[ Tomato ]] have IPMI cards installed. These cards are accessible from the Farm subnet. Their addresses are: |
| − | + | Tomato: [http://10.0.0.148/ 10.0.0.148] <br/> | |
| − | + | Taro: [http://10.0.0.147/ 10.0.0.147] <br/> | |
| − | + | Gourd: [http://10.0.0.151/ 10.0.0.151] <br/> | |
| − | You will need to use the ADMIN user account with the system's root password to access the IPMI devices. | + | You will need to use the ADMIN user account with the system's root password to access the IPMI devices. The SuperMicro cards run a web interface to which you can talk directly. Log in as ADMIN with password and you can check the temperatures. |
| − | + | Currently each is working via the web interface, and by using tools such as ipmitool and IPMIView. Tomato is configured to allow Serial-over-lan connections. Taro and Gourd have this capability, but need to be tested to make sure that this functionality works. Enabling SOL requires opening a terminal on the correct serial interface, which can be determined by viewing the system's BIOS configuration. Testing and setting this up will require some rebooting, and should be done during a slow time when downtime is less impactful. | |
| − | == | + | == Tools == |
| − | + | === Supermicro IPMIView === | |
| − | + | SuperMicro IPMI control software (over LAN) is installed in /opt/SUPERMICRO/IPMIView/ on Taro, Tomato, Pumpkin, Gourd, Lentil, Pepper and Benfranklin. It offers a complete graphical interface for controlling IPMI devices and monitoring sensors. This is the an excellent tool for working with IPMI due to its intuitive graphical interface. To run IPMIView first connect via ssh using X forwarding so you can run a graphical application: | |
| − | + | ssh -X username@taro | |
| − | + | Next run the IPMIView20.bin script /opt/SUPERMICRO/IPMIView/ as root. To make this easier to do there is a symlink to the script at /usr/local/bin/ipmiview so that typing "ipmiview" into a console should run it. For some reason the program will look for its settings file in your current working directory so make sure to cd back to /root if you want the IPMI enabled systems to show up in the list when you start the program. | |
| − | Screenshot of IPMIView monitoring [[ | + | Screenshot of IPMIView monitoring [[Tomato]]'s sensor readouts:<br/> |
[[Image:ipmiview_sensors.png|500px|alt=Supermicro IPMIView screenshot]] | [[Image:ipmiview_sensors.png|500px|alt=Supermicro IPMIView screenshot]] | ||
From here you can select the machine you want to control by double clicking its name in the menu on the left side of the screen. From there you can login to each machine using the ADMIN username and the system's root password. | From here you can select the machine you want to control by double clicking its name in the menu on the left side of the screen. From there you can login to each machine using the ADMIN username and the system's root password. | ||
| − | ==== Command Line | + | ====Adding machines in IPMIView==== |
| + | |||
| + | It's possible that the machine you want to control isn't available in the IPMIView interface, and you'll need to add it. Just choose File -> New -> System and enter the system's name and IP address. Once you click OK the system should appear in the menu on the left side of the window. From there you can select the machine and login to control it via IPMI. | ||
| + | |||
| + | === Command Line === | ||
[[ipmiconsole]] is a command-line tool for opening a Serial-over-LAN console to remote [[IPMI]] enabled devices. It can be installed via the yum repos on Red Hat and Fedora machines with this command: | [[ipmiconsole]] is a command-line tool for opening a Serial-over-LAN console to remote [[IPMI]] enabled devices. It can be installed via the yum repos on Red Hat and Fedora machines with this command: | ||
| − | + | sudo yum install freeipmi | |
| − | Currently this package is installed on | + | Currently this package is installed on Tomato, Taro, Pumpkin, and Benfranklin. |
[[ipmitool]] is a command-line tool for sending [[IPMI]] control messages to remote [[IPMI]] enabled devices. It can be installed on Red Hat and Fedora machines using this command: | [[ipmitool]] is a command-line tool for sending [[IPMI]] control messages to remote [[IPMI]] enabled devices. It can be installed on Red Hat and Fedora machines using this command: | ||
| − | + | sudo yum install OpenIPMI-tools | |
| + | |||
| + | === Web === | ||
| − | + | Each machine's IPMI card has its own web interface. Click the links at the top of the page to access them ( your browser needs to be running on a machine that has a Farm connection for these links to work ). | |
| − | [ | + | [[image:Taro_ipmi_web.jpg|450px|border|Web view of the IPMI information on Taro]] |
| − | == Setup | + | == Setup == |
=== Taro === | === Taro === | ||
| Line 66: | Line 71: | ||
[[image:Taro_ipmi_view.jpg]] | [[image:Taro_ipmi_view.jpg]] | ||
| − | === | + | === Tomato === |
| − | + | Tomato's IPMI card is configured in the same way as Taro's through the system BIOS. At this point it works, but the serial console forwarding is not yet configured. I added the above lines to the inittab and grub configuration files, but it still doesn't appear to be working at this time. | |
=== Pumpkin === | === Pumpkin === | ||
| − | Pumpkin's IPMI controller is a [http://www.tyan.com Tyan Computer] model [http://www.tyan.com/product_accessories_spec.aspx?pid=5 m3291]. | + | Despite several attempts to configure Pumpkin's IPMI card we were never able to get it working. Therefore, it was removed on 12/15/2009. Now only Taro, Tomato and Gourd have functional IPMI cards. |
| + | |||
| + | Pumpkin's IPMI controller is a [http://www.tyan.com Tyan Computer] model [http://www.tyan.com/product_accessories_spec.aspx?pid=5 m3291]. Its IP address was supposed to be 10.0.0.143 | ||
| − | Configuring Pumpkin's card requires a different procedure from that of | + | Configuring Pumpkin's card requires a different procedure from that of Tomato and Taro's cards. A full description is available in the official product [http://www.tyan.com/support_download_manuals.aspx?model=A.M3291 manual]. Currently Pumpkin's IPMI card is not yet completely configured, and at the moment isn't available. It should be ready in the near future. Here is the setup so far: |
You will need to use Tyan's [ftp://ftp.tyan.com/software/tso/m3291/utility/Linux/ uh8l] utility to change it's configuration from the command line. I've installed it in /usr/bin on pumpkin. | You will need to use Tyan's [ftp://ftp.tyan.com/software/tso/m3291/utility/Linux/ uh8l] utility to change it's configuration from the command line. I've installed it in /usr/bin on pumpkin. | ||
| Line 84: | Line 91: | ||
Flashing the firmware is a two-step process. Tyan includes a script, called '''linuxfls''' which they claim completes these steps for you, but it didn't seem to work for me. You can do it manually using the '''uh8l''' utility with these commands ( make sure to use the correct path to the files if they aren't in your current working directory) : | Flashing the firmware is a two-step process. Tyan includes a script, called '''linuxfls''' which they claim completes these steps for you, but it didn't seem to work for me. You can do it manually using the '''uh8l''' utility with these commands ( make sure to use the correct path to the files if they aren't in your current working directory) : | ||
| − | + | sudo uh8l --sdr 4985r01.sdr --nrst | |
Then | Then | ||
| − | + | sudo uh8l -u 4985r20.BIN | |
Now that the correct firmware is installed you can configure the card's IP settings. You need to set the IP, MAC Address, Network Mask, and Default Gateway. This will do it in one command: | Now that the correct firmware is installed you can configure the card's IP settings. You need to set the IP, MAC Address, Network Mask, and Default Gateway. This will do it in one command: | ||
Latest revision as of 21:44, 6 July 2012
IPMI - Intelligent Platform Management Interface
Gourd , Taro , and Tomato have IPMI cards installed. These cards are accessible from the Farm subnet. Their addresses are:
Tomato: 10.0.0.148
Taro: 10.0.0.147
Gourd: 10.0.0.151
You will need to use the ADMIN user account with the system's root password to access the IPMI devices. The SuperMicro cards run a web interface to which you can talk directly. Log in as ADMIN with password and you can check the temperatures.
Currently each is working via the web interface, and by using tools such as ipmitool and IPMIView. Tomato is configured to allow Serial-over-lan connections. Taro and Gourd have this capability, but need to be tested to make sure that this functionality works. Enabling SOL requires opening a terminal on the correct serial interface, which can be determined by viewing the system's BIOS configuration. Testing and setting this up will require some rebooting, and should be done during a slow time when downtime is less impactful.
Tools
Supermicro IPMIView
SuperMicro IPMI control software (over LAN) is installed in /opt/SUPERMICRO/IPMIView/ on Taro, Tomato, Pumpkin, Gourd, Lentil, Pepper and Benfranklin. It offers a complete graphical interface for controlling IPMI devices and monitoring sensors. This is the an excellent tool for working with IPMI due to its intuitive graphical interface. To run IPMIView first connect via ssh using X forwarding so you can run a graphical application:
ssh -X username@taro
Next run the IPMIView20.bin script /opt/SUPERMICRO/IPMIView/ as root. To make this easier to do there is a symlink to the script at /usr/local/bin/ipmiview so that typing "ipmiview" into a console should run it. For some reason the program will look for its settings file in your current working directory so make sure to cd back to /root if you want the IPMI enabled systems to show up in the list when you start the program.
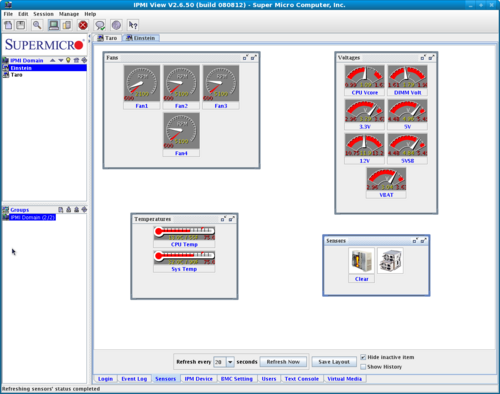
Screenshot of IPMIView monitoring Tomato's sensor readouts:

From here you can select the machine you want to control by double clicking its name in the menu on the left side of the screen. From there you can login to each machine using the ADMIN username and the system's root password.
Adding machines in IPMIView
It's possible that the machine you want to control isn't available in the IPMIView interface, and you'll need to add it. Just choose File -> New -> System and enter the system's name and IP address. Once you click OK the system should appear in the menu on the left side of the window. From there you can select the machine and login to control it via IPMI.
Command Line
ipmiconsole is a command-line tool for opening a Serial-over-LAN console to remote IPMI enabled devices. It can be installed via the yum repos on Red Hat and Fedora machines with this command:
sudo yum install freeipmi
Currently this package is installed on Tomato, Taro, Pumpkin, and Benfranklin.
ipmitool is a command-line tool for sending IPMI control messages to remote IPMI enabled devices. It can be installed on Red Hat and Fedora machines using this command:
sudo yum install OpenIPMI-tools
Web
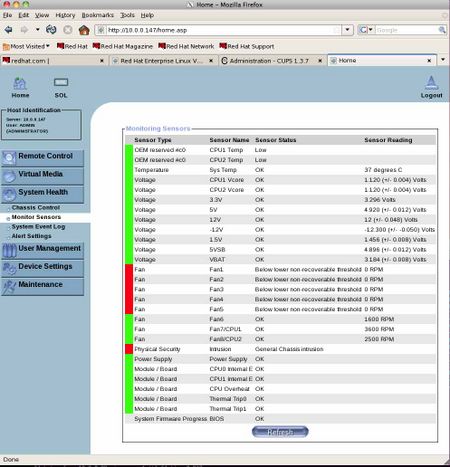
Each machine's IPMI card has its own web interface. Click the links at the top of the page to access them ( your browser needs to be running on a machine that has a Farm connection for these links to work ).
Setup
Taro
Taro has a SuperMicro IPMI card installed.
Initial configuration was through the BIOS (under Advanced). Basically, I just plugged in the card, then set the IP number.
Finally in Taro, you need to add a line for the serial console to work. In inittab add the lines:
#
# Run a console on the serial line to the IMPI card
#
T1:2345:respawn:/sbin/mgetty -r -s 19200 ttyS1
#
And for GRUB you want to add:
...... console=tty0 console=ttyS1,19200n8r
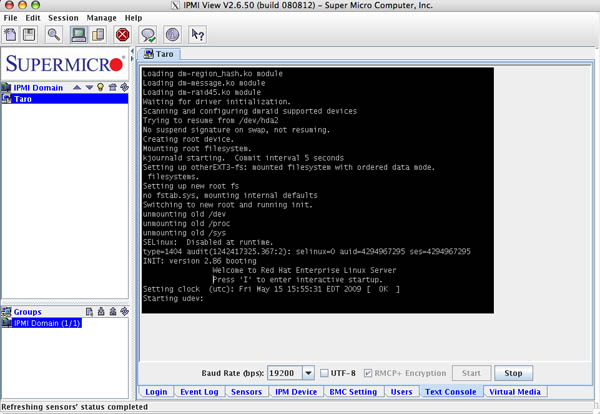
Here is a screenshot of the IPMI monitoring Taro reboot:
Tomato
Tomato's IPMI card is configured in the same way as Taro's through the system BIOS. At this point it works, but the serial console forwarding is not yet configured. I added the above lines to the inittab and grub configuration files, but it still doesn't appear to be working at this time.
Pumpkin
Despite several attempts to configure Pumpkin's IPMI card we were never able to get it working. Therefore, it was removed on 12/15/2009. Now only Taro, Tomato and Gourd have functional IPMI cards.
Pumpkin's IPMI controller is a Tyan Computer model m3291. Its IP address was supposed to be 10.0.0.143
Configuring Pumpkin's card requires a different procedure from that of Tomato and Taro's cards. A full description is available in the official product manual. Currently Pumpkin's IPMI card is not yet completely configured, and at the moment isn't available. It should be ready in the near future. Here is the setup so far:
You will need to use Tyan's uh8l utility to change it's configuration from the command line. I've installed it in /usr/bin on pumpkin.
The first step is to flash the card's firmware with the correct version for the system's motherboard. The firmware package for Pumpkin's motherboard (Tyan S4985) can be downloaded from Tyan's ftp site at this link. I also have a copy of it locally in my home folder ( /net/home/aduston/ipmi ).
Inside the zip file are two other zip files, one is for 4 processors systems, one is for 8 processor systems. Pumpkin's board has four processors, so you will need to use the files in S4985-4P_R20.zip. The firmware files will be extracted to a folder called FW/.
Flashing the firmware is a two-step process. Tyan includes a script, called linuxfls which they claim completes these steps for you, but it didn't seem to work for me. You can do it manually using the uh8l utility with these commands ( make sure to use the correct path to the files if they aren't in your current working directory) :
sudo uh8l --sdr 4985r01.sdr --nrst
Then
sudo uh8l -u 4985r20.BIN
Now that the correct firmware is installed you can configure the card's IP settings. You need to set the IP, MAC Address, Network Mask, and Default Gateway. This will do it in one command:
$ sudo uh8l -m <MAC address> -i <ip addresss> -n 255.255.252.0 -g 132.177.88.1
According to the manual the device should detect its own MAC address, but in my experience it did not. I tried giving it the MAC address that was printed on the card, but at this point the network connection isn't working. Further instructions will be added once I resolve this issue and get the network connection working.

